Brett's Birthday Bonanza
Hi Friends-
Yesterday was an exciting day. As you may know, the hubby turned a year older today. In addition, my best good friend Katharine is visiting for the weekend!! (READ: I have a baking partner for the weekend!!!) Anyways, at midnight we kicked off the birthday and I gave him his present: a make your own beer kit! He's pretty excited to start brewing away :) In the morning, K& I whipped up a pretty fancy bday feast, which he enjoyed:
Then he opened his present from Katharine. And that went a little something like this:
He is very excited about this shirt as well :)
After running some errands and a trip to the grocery store, Katharine and I got started on some things for Brett's birthday party.
First, we made some guacamole:
Then we got some pulled chicken started in the crockpot:
Next up: DESSERTS!! We decided to do three different desserts instead of a plain old cake.
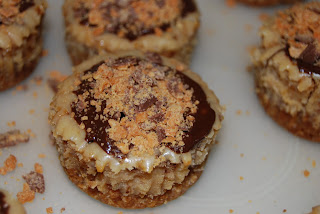
First, we made peanut butter-butterfinger mini cheesecakes. If you stretch your memory back, you'll remember that these were on my list of things to make before we went to NYC. So here there are.
*Original recipe found here
We had to double the filling quantities because the original uses a mini cheesecake pan and we used muffin tins...so I put our new quantities below
1 cup Vanilla Wafers, ground
2 Tablespoons granulated sugar
2 Tablespoons butter, melted
1/8 teaspoon table salt
For the cheesecake:
Two 8 ounce package cream cheese, room temperature
1/2 cup creamy peanut butter
1 cup granulated sugar
2 eggs
4 Tablespoons heavy cream8
8 fun size Butterfinger candy bars (I used 1/2 a king size Butterfinger, about 2 oz.)
For the topping:
1 cup semi-sweet chocolate chips
2-3 Tablespoons heavy cream
Crushed Butterfinger
Combine 1 cup ground vanilla wafers, 2 Tablespoons granulated sugar, 2 Tablespoons melted butter and 1/8 teaspoon table salt. Divide mixture into bottoms of mini cheese cake pan and press until flat.
Bake in a 350 degree oven for 8-10 minutes or until golden brown. Reduce oven temperature to 300 degrees.
Beat cream cheese and 1/4 cup creamy peanut butter until smooth. Beat 1/2 cup sugar, 1 egg, 2 Tablespoons heavy cream and 1/8 table salt until well combined. Slowly stir in crushed butterfinger.
There's Katharine, being her lovely self :)
Evenly pour batter over baked crust. Bake for 20-22 minutes until cheesecake is set. Don't forget to turn down your oven temperature to 325 degrees.
After cooling, your cheesecakes will depress a bit, creating a perfect well for the chocolate sauce.
Melt one cup chocolate chips in microwave in 30 second intervals. Stir in between intervals and do not overcook the chocolate. Add heavy cream in small doses to the chocolate and stir until chocolate is smooth and glossy. If you add the cream too fast you will get lumps. (We accidentally left the cream out completely...oh well!) Spoon the chocolate over the tops of the cakes. Spoon crushed Butterfinger over the top of the chocolate.
Next up: Better than Crack Brownies
*original recipe found here
1 batch brownies
1/2 cup salted peanuts
1 cup chopped Reese’s peanut butter cups
1 1/2 cup milk chocolate chips
1 1/2 cup creamy peanut butter
1/2 tablespoon butter
1 1/2 cups Rice Krispies Cereal
Mix brownies according to directions, and bake for 20-25 minutes in a 9 x 13 baking dish.
Remove and top with peanuts and peanut butter cups, and bake for 4-6 minutes more.
While they are finishing baking, melt chocolate chips, peanut butter and butter. Stir in cereal.
Remove brownies from oven and evenly pour chocolate mixture over top.
Refrigerate for 2 hours before serving.
And finally: Cake Balls!
That's right. That's cake and frosting mashed up into a little ball and dipped in chocolate. What could be better?!
Here's what you do:
Bake a cake. After it has cooled completely, cut it into quarters and crumble it in a large bowl.
Stir in 3/4 jar of frosting.
Use a cookie baller to form into balls and place in the freezer for 1 hour.
Then, get some chocolate made for dipping, melt it and dip and decorate to your heart's content :)
If you'd like to be impressed, check out Bakerellas cake balls. Very impressive.
So ta da! Desserts are done. Here's the final spread for the party:
Enjoy!
--Lindsay--


0 Comments:
Post a Comment
Subscribe to Post Comments [Atom]
<< Home