The Lean Green Bean

Tuesday, August 31, 2010

Salmon Seconds

I needed to use  up the rest of  the  salmon that I cooked and didn't put in my chowder, so I made some salmon cakes tonight. Very easy since the salmon is already cooked. Put the salmon in a bowl with some finely chopped onion, green pepper, and garlic.


Add some breadcrumbs, an egg and some seasoning (I used salt, pepper and mccormicks).


I accidentally got a little heavy handed with the bread crumbs and had to add another egg. Start with less breadcrumbs, you can always add more!

Mix everything together and form them into whatever size cakes you want:


Put them in the fridge or freezer for 1/2 an hour or so...it will help  them stick together better in the pan. When you're ready to cook them, heat a little oil  in a pan, and add some of the cakes but don't crowd the pan. I did mine in two batches.


Carefully flip them over once to get a nice crunchy outside, then place on a baking sheet and finish them off in the oven for about 10 minutes to heat all the way through. My oven was already at 425 from the brussels sprouts and that worked just fine, but it probably didn't need to be quite that hot.


*Random bonus tip: If you're going to try a new recipe, do it on a night when you already have leftovers in the fridge. That way, if it turns out horribly, you still have something to eat!

Enjoy!

--Lindsay--

Labels: ,

Venturing Into Vegetables

This year I made a promise to myself that I would try some new vegetables...so slowly but surely I've been venturing deeper into the vegetable world. Over our Christmas vacation, I tried baby bok choy. Better, in my opinion, than regular bok choy because I love anything miniature :) The result? Not bad. Just roughly chop, saute with some oil and garlic, maybe a dash of soy sauce and enjoy as a side dish.

In April, when I started my no-meat experiment, one of the first vegetarian recipes I made was a Swiss chard, white bean and sweet potato soup. Before I found the recipe, I had no idea what Swiss chard even looked like, let alone that the stems come in a rainbow of colors. The result? Excellent! It's pretty much interchangeable  with spinach so I've been putting in soups, pasta dishes, anywhere I would typically throw in some baby spinach. I would recommend  cooking though, as opposed to just having a swiss chard salad!

Another early spring adventure was asparagus. Everyone in my family loves it roasted and topped with balsamic vinegar. I hadn't eaten any in a while. The result? Good. I still can't stand it if it's mushy, but lightly roasted so it still has a little crunch to it and topped with some good balsamic vinegar it tastes pretty good.

The summer farmer's market sparked adventures with beets and eggplant. There's something about eggplant that draws me to it every time..maybe the color, it just looks so pretty. The result? Pretty good. I tried a lasagna with eggplant "noodles" and made a grilled eggplant and roasted bell pepper brushchetta that was pretty darn tasty.


No real recipe for this one...just sliced a multigrain baguette, brushed with olive oil, rubbed a clove of garlic over the slices and toasted them in the oven. Then I thinly sliced the eggplant, sprinkled it with salt and let it drain in a ...colander for 30 min or so (draws out some of the bitterness), then rinsed off the salt, patted dry, brushed lightly with oil and seasoned (i used black pepper and Mccormicks grill seasoning), put them on the grill for a couple minutes each side. If you slice them thin enough you don't really have to cook them too long, just get the grill marks and let them soften a bit. I roasted the pepper in the oven until it was charred and peeled off the skin. then just cut the eggplant and pepper into pieces to match the baguette slice size, top with eggplant, pepper, tomato slices and fresh mozzarella...then i put them in the oven for a couple of minutes to melt the cheese!
I diced up the leftover grilled eggplant and threw it into my spaghetti sauce the next night, and also put diced eggplant in my vegetable tacos. My next effort is going to be  Eggplant Parmesan!


While my parents were visiting in July, we bought some beets at the farmers market. I'm not certain I'd ever had a beet before then but my parents eat them all the time...one of my dad's favorite vegetables. The result? Not bad. My dad orders the beet salad pretty much anywhere that has it when we go out to eat. I'm not sure I'd ever go that far...but they weren't bad. Just cut off the greens (you can cook those too!), wrap them in foil and into the oven they go for an hour or so. Let them cool enough to touch, peel the skin off and slice them. I'm on the hunt for a good beet recipe to get my in-laws to try beets again. I'll keep you posted (haha, no pun intended). 

We had a discussion this past weekend about trying new vegetables and they have agreed to try beets again. So in the spirit of trying new vegetables, I decided to challenge myself again and take on one of my biggest vegetable enemies: Brussels sprouts. Another of my dad's favorite vegetables (are we seeing a trend here?). Ever since I can remember these have been  his favorite vegetable. My mom used to just make a little dish of plain, steamed sprouts just for him at our dinners growing up. No one else  in the family would eat them. I'm not quite that brave...but I passed some in the grocery store and decided to give it a whirl. I made mine roasted with olive oil, a little bit of bacon, salt and pepper. The result? Average. Still not my favorite vegetable but to quote my husband, "I don't find them as repulsive as I used to." Part of the problem was that I roasted them a little too long so they were right on the edge of being mushy. Other than that, they were edible, but I don't think I'll be buying them again anytime soon.


To try them yourself:


Cut the stem off the brussels sprouts and peel off any yucky-looking outer leaves. 

Halve or quarter them and put them on a jelly roll pan with some chopped bacon (I use turkey bacon), drizzle with olive oil and season with salt and pepper

Roast at 425 for 20 minutes or so and then check on them.


Don't let them get too mushy! Stir occasionally to spread the bacon and other seasonings around.


I challenge all of you to try a new vegetable! Pick one out at a the store that looks interesting and you've never tried  before, or better yet, try one that you hated 10 years ago and haven't touched since then. Find yourself a recipe that sounds good and give it a whirl...you never know! 

Enjoy!
--Lindsay--

Labels: , , ,

Monday, August 30, 2010

Lateral Split Lasagna & Roasted Potatoes

Tonight was lasagna night. Essentially I made a half and half lasagna- half meat, half bean. A lot of people I talk to about my decision to eat less meat say "Oh, I'd love to do that, but my husband/wife love their meat and I don't have time to cook two meals." NOT a good excuse. There are a lot of meals that can be made half and half like this lasagna or nachos. Another option is to make meat and add-in. Don't make it the center of the dish, but still cook it. That way, the people that want it can add it in and the people that don't want it can leave it out! Simple, right?

If you're going to add meat, choose chicken or turkey over red meat. We use ground turkey in our house. It can be used for anything you would use ground beef for- and it's better for you!

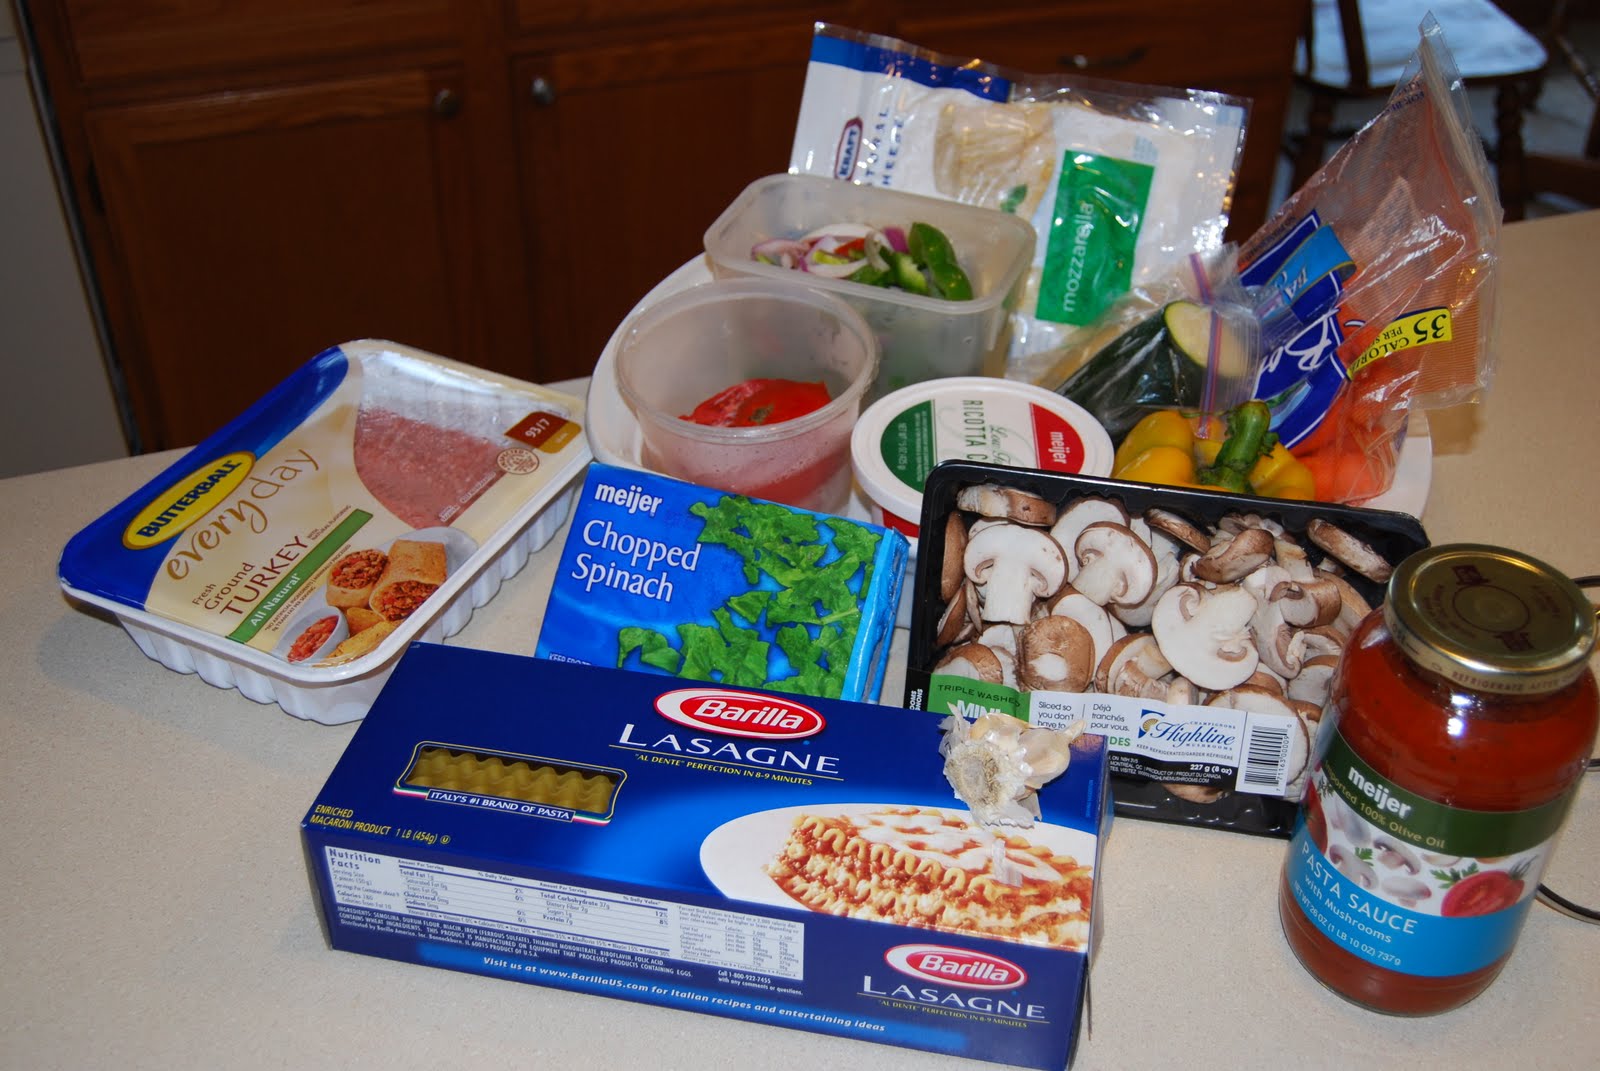
So here we go! We're going to make all of this into a delicious dish:


Cook your meat first if you're using it. Heat some olive oil and garlic in the pan, add the meat and cook through. I added a little McCormick's seasoning but you could add Italian seasonings instead. Once it's cooked, drain the pan, transfer to a bowl and set aside. Wash your pan thoroughly and heat it up again to use for the veggies.


Next, cook your noodles. I make my lasagna with 3 layers of noodles, so I usually make about 10 noodles.  Lay your noodles flat once they are cooked so they don't stick together!


Time for the veggies. Lasagna doesn't always have a lot of veggies, but I see it as an opportunity to cram a lot of vegetables into one dish! Chop up whatever you have and/or like. I used yellow and green peppers, onion, carrots, mushrooms, squash and zucchini.


Saute with garlic and olive oil until softened and then add a jar of tomato sauce to the pan.


Next, defrost a package of frozen spinach. Place the spinach in a clean dish towel and wring out the extra moisture.


Add the spinach (I usually only use 1/2 the package but it's up to you) to a small bowl with a 15 oz container of ricotta (low-fat). Toss in some basil and oregano and 1/2 a cup or so of hot water. This helps melt the cheese a bit and it all mixes together nicely.


So you've got your meat, your veggie sauce, your ricotta mixture and your noodles and you're ready to go!

In a 9x13 pan, put a layer of the veggie sauce on the bottom to keep the noodles from sticking to the pan. If you're making it half and half like I did, I topped one half with meat and the other half with some frozen cannellini beans and a little bit of quinoa.


Next add a layer of  noodles and spread the cheese/spinach mixture over the noodles:


Continue layering until you run out of room in the pan, or ingredients. Remember that lasagna doesn't have to be pretty...It can be sloppy and no one will really know :) You can add shredded mozzarella on top of each spinach/cheese layer if you want, but I save most of my cheese for the top and just add a little after the first layer of noodles.


Cover with foil and bake for 40 minutes or so in a 375 degree oven until heated through. Remove from oven:


While your lasagna cools to a reasonable temperature, bump up the oven temperature to 425 to make some roasted potatoes!

I use red potatoes, scrubbed clean (not peeled) and diced:


Toss them on a pan, add some olive oil, rosemary, pepper and a little kosher salt and mix to evenly coat:


Into the oven for 30 minutes or so...stir them occasionally to brown all sides. When they are brown and crispy, take them out:


Slice your lasagna:


Add some green beans and potatoes and ta-da!!!


Cut your lasagna into pieces and freeze it if you have too many leftovers. Enjoy!

--Lindsay--

Labels: , ,

Sunday, August 29, 2010

Egg-cellent Snack

As you may have gathered by now, I'm a huge proponent of "a little prep now saves A LOT of time later!"

Today I made hard-boiled eggs. They're a great snack, packed with protein, easy to make and easy to eat. They great for packed lunches or post-workout snacks! There are a million different ways to make hard boiled eggs. This is how I make mine:

Put the eggs in a tall pot, cover with water, cover and turn on the heat.


20 minutes after you turn on the heat, turn it off and use tongs to plop the eggs into a bowl of ice water. This helps the egg shrink away from the shell a little bit and they peel way more easily!


Once they cool, store them in the  fridge and you've got snacks for the whole week. Discard the yolks when you eat them for a snack and you've got pretty much just protein! You could also slice them up and put them on a salad...

Enjoy!

--Lindsay--

Labels: ,

Oh So Sweet Potato Chips

Super easy, healthy and great with any dinner!

This snack starts in the grocery store when you are picking out your sweet potatoes. Try to choose ones that are similar width all the way from one end to the other.


Next,  get yourself a mandolin if you don't already have one. It's another one of those appliances that isn't used every day, but is oh so helpful when you do pull it out. When I have my dream house and dream kitchen, I'm going to have a special shelf area solely devoted to appliances/kitchen tools used less than 5 times per year. Things like the roasting pan, immersion blender, carving knife...you know the kind. Although I use my mandolin more often than that...it's definitely not an every day kind of item. I procured mine for free from my mom's basement last winter! They can, however, be quite expensive. So have no fear if you don't have one...these can be done by hand...I did it for several years.

Slice them thinly using the mandolin or a knife...no need to peel the potato. A word of warning. The mandolin comes with this little thingamabob that holds the potato for you...USE IT. I took a nice slice out of my finger a few months ago trying to get by without it...it's included for a reason!


These chips are also a favorite of the dogs...they LOVE sweet potatoes...the uncooked ones. I think they recognize them by sight.

And they chow down :)


As soon as you think about having these for dinner, slice them and put them in water. Soaking them in water will draw out some of the sugar in the potatoes and then they don't burn as easily. If you don't plan in advance, that's fine too. You can make them just the same without soaking them just watch them a little more closely in the oven. Soak them anywhere from 30 minutes to 24 hours.


When it's time to cook them, drain the water and use your salad spinner to dry them off. Remove the ones with thin edges, they will burn too easily!


Rinse out your soaking bowl, put the chips back in, drizzle with olive oil and season with paprika.


Spread the chips onto a baking tray and add more paprika if desired:


Into the oven at 375 degrees for 10 minutes, then flip them over:


Cook 10-15 minutes more or until they look similar to this:

Some may burn but that's ok. Transfer to a plate, add some ketchup and enjoy!


--Lindsay--

Labels: , , ,

Super Salad!

This is probably one of my favorite salads ever--so I thought I would share it with you :)

Strawberry Spinach Salad with Lemon Poppyseed Dressing

Wash your baby spinach and strawberries:


Top the spinach with sliced berries and red onion.


**A tip: Make a big salad at the beginning of the week when you're motivated by the guilt of everything bad you ate over the weekend! Then you can eat it all week instead of using the excuse that you're too tired to make one :)

*Store the dressing separately and add just before eating.

For the dressing:

Juice a lemon into a small bowl. Add a tablespoon of vegetable oil and two tablespoons of white wine vinegar. Add a little bit of sugar if it's not sweet enough for you. Sprinkle in some poppyseeds, stir to combine and drizzle over the salad!


Enjoy!

--Lindsay--

Labels: , ,