The Lean Green Bean

Sunday, October 31, 2010

Chicken Parmesan

Let me just start by saying that you, my friends, dodged a bullet this evening. You almost got a picture-less blog post! As I type this, dinner is in the oven....baking  away. We're having Chicken Parmesan. It's nothing new, nothing exciting, in fact- it's pretty much a staple in our house. This, coupled with the fact that I was almost certain I  had posted about it before, ALMOST led to me not taking any pictures while I made it!! But, on a whim....I decided to take them anyways...AND IT'S A GOOD THING I DID! Because when I sat down to review my past posts, I found that I had not actually ever posted about this. At least I don't think I did. If you are aware of a prior post about chicken parm then you're probably thinking I'm crazy right about now, and in that case you can just ignore the rest of this post :) But I'm going to proceed on the assumption that my searching skills are not lacking  and that this is not a repeat post.

Soooo, you're in luck. This post will be filled with pictures and instructions as usual :)


Here we go. I don't follow a recipe for this, but here's what I do.

If you're feeling particularly angry, you can pound your chicken breasts thin with a mallet. If you're not feeling quite so animated, you can just cut them in half like I did this evening. Don't be scared to pound though. Both methods get the job done. Come to think of it, you don't really need to do anything to the chicken if you don't want to...I just choose to so that it cooks faster.

So, cut or pound your chicken. I usually remove the little tenderloin on the bottom of each and treat them as their own piece.


For my breadcrumbs, I use a mixture of panko and regular, but use whatever you prefer. I buy my breadcrumbs unseasoned, but for this I add in some oregano and basil.


Dip each piece in an egg, then the breadcrumbs. Some people use flour first, but to me, that just dirties up another dish and I don't really like a ton of breadcrumbs anyways so I don't care that I don't get a heavy coating.


Get a pan nice and hot, add some oil and pan sear to get a nice brown color on each side....or if you're lazy, just one side...no one will ever see the bottom :)

 
Spread some tomato sauce on the bottom of a 9x13 pan to keep the chicken from sticking:


Put the chicken in the pan:


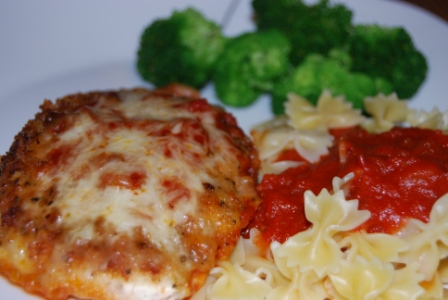
Top with tomato sauce and mozzarella cheese.


Cover with foil and bake at 375 degrees for 20-30 minutes, depending on how thick your chicken is. Serve with pasta and veggies!


Enjoy!
--Lindsay--

Apple Chips


Hi Friends-

Somewhere, in one of the many magazines I get, I found this tiny tidbit about making apple chips.


I cut it out and it has been hanging out on my fridge, as well as in my mind, for quite some time...always there...nagging me...but not enough to get me to actually make them. Well today I did. And they're delicious! And SO simple. Here's what you do:


Core your apples:


Use a mandolin, or a verrrry steady hand to slice them as thin as you can get them...so they're almost see through...and lay them on a baking sheet:


 The recipe said to sprinkle with sugar but my apples are quite sweet already so I used cinnamon instead:


Bake at 200 degrees for about an hour and a half. I turned mine over once but I think the heat is low enough that you don't really need to. Remove and consume :)
**EDIT: Definitely flip them over half way through. I tried not flipping on my second batch and ended up flipping them and leaving them in longer. Flipping them gives both sides a chance to dehydrate!***


Enjoy!
--Lindsay--

Saturday, October 30, 2010

Pumpkin Mini Donuts w/ Cinnamon Glaze

Good news friends! These donuts were waaaay more successful than my last batch!


Here's the original recipe...I didn't really change anything.

Baked Pumpkin Donuts
2 cups flour
1 ½ tsp. baking powder
½ tsp. salt
¼ tsp. baking soda
1 tsp. nutmeg (I didn't use this)
2 tsp. cinnamon
½ cup brown sugar
1 cup canned pumpkin
2 eggs
2 Tbl. milk
¼ cup unsalted butter, room temperature
1 tsp. vanilla extract
Directions:
Preheat the oven to 375 degrees.  Sift the flour, baking powder, salt, baking soda, and cinnamon in a small bowl.  Set aside. 

Cream together the brown sugar, canned pumpkin, eggs, milk, butter and vanilla extract until the butter is well incorporated.  With your mixer on medium low speed, slowly add the dry sifted ingredients to the wet mixture.  Mix until just barely combined.  Be careful of over mixing.
Spray the donut pan with cooking spray and fill each donut mold halfway with the pumpkin batter.  Bake at 375 degrees for 6 – 8 minutes or until the exterior springs back when touched.  (I spooned the batter into a ziploc bag and piped it into the rings. It was MUCH easier than last time when I tried to use a spoon!


Allow to cool completely and top each donut with cinnamon glaze.
Cinnamon Glaze
½ cup powdered sugar
1 Tbl. milk
½ tsp. cinnamon

Mix until smooth and creamy.  The glaze should pour easily from a spoon.  You may need to add additional milk or powder sugar to get the right consistency.


The pumpkin makes these darker so they look more like fried donuts and the consistency is more like a cake donut than the last batch. YUMMY!!!

Enjoy!
--Lindsay--

Friday, October 29, 2010

A Dinner Divided

Sometimes, my friends, the hubby and I just don't agree on dinner....we go around and around in circles...and then this happens:

He orders taco pizza:

And I make this:


And that's just the way it is :)

In other news, here's a few things I bookmarked this week:

Chocolate & Brie Panini- from A Cozy Kitchen...not something I would usually make but it sounds SO good!

Tandoori Chicken & Spinach Salad- from Good Life Eats...yes puhleez!

Shredded Sprouts Salad- from How Sweet It Is...a new recipe using my dad's fav veggie :)

Apple Bacon Spinach Salad- from Gimme Some Oven...I wanted this IMMEDIATELY after I saw the picture

Homemade Panko Breadcrumbs- from How Sweet It is...how fun!!

Apple Cider Vinaigrette- from Gimme Some Oven....yes!!!!!!!!!

Crockpot Tex Mex Pot Roast- from A Year of Slow Cooking...thinking of the hubby on this one.

And to get you in the fall spirit....here's the scarecrow family the hubby and I made a couple years ago:


Aren't they cute?!

Enjoy!
--Lindsay--

Thursday, October 28, 2010

Sweet Potato & Black Bean Chili

Tonight, the hubby requested sweet potato and black bean chili. It's becoming a Halloween tradition in our house and it really couldn't be more appropriately colored!


 Black and orange soup for Halloween?! What could be better??

I found this recipe here:


 This was one of the cookbooks I bought while doing my meat-free experiment earlier this year. It has some good recipes in it!


 Here's what you do:

Saute some onion, garlic and 2 diced sweet potatoes for a few minutes. Add a jar of mild (or hot) salsa and 2 cups of water.


Add 1-3 teaspoons of chili powder, depending on how spicy you like it.  Bring to a boil, then reduce heat and simmer until the potatoes are tender.


Add the black beans (either 2 cans, or in my case frozen).


Simmer until ready to eat. Add more chili powder if necessary!


Here in Ohio, trick or treating happens on the Thursday before Halloween so we just came inside after passing out candy for an hour and a half. It was COLD out there!! We had about 100 kids. Best costume was the wolf from Little Red Riding Hood who dressed as grandma.

Here's this year's pumpkins:


And the boys enjoying Halloween:


Enjoy!
--Lindsay--


Wednesday, October 27, 2010

Spinach & Chickpea Soup with Sausage

The only requirement for tonight's dinner was that it needed to be simple, simple, simple.

So soup it was!


Inspired by this recipe, here's what I did:

I sauteed some onion, garlic, red pepper, frozen corn and sausage in my soup pot:


This is my favorite brand of chicken sausages...They have some great flavors


Then I added some veggie broth and chickpeas and let them simmer for a little bit:


 Remember these bad boys? Perfect time to try out my fire-roasted tomatoes!


 I added the tomatoes (and the juice! since there was no salt added I didn't need to rinse them off) and some chopped baby spinach to the pot and left it alone to let the spinach wilt.


Stir and let simmer for an hour or so...or pretty much until whenever you're ready to eat. Add more broth or water if you need more liquid and season with pepper and a little salt:


The result? Good! The juice from the tomatoes adds some extra flavor to the broth and each bit was full of veggies. I'll make this one again for sure.
Remember waaaaay back when I was talking about trying new vegetables? Well I took a little hiatus but I'm back at it and this week I decided to give cauliflower a try. I have no real memory of ever eating cauliflower so I figured it was time.

I cut the trees off the stem, tossed in olive oil, seasoned with salt and pepper and roasted them  at 400 degrees for 18 minutes, stirring once. When they were done, I grated some Parmesan cheese on top and drizzled with balsamic vinegar. There's just no way to make a white veggie look all that pretty but here you go:


The verdict? Pretty good. I think I over-cooked it just a little but I was pleasantly surprised when I didn't mind eating it!
Today Lindsay's Lunchbox was the home lunch edition. It was quite a treat to have something warm for lunch since 4 days a week I'm eating cold lunch out of my car. I had oatmeal and yogurt. 

I like this kind because it's low in sugar, has lots of fiber and protein and tastes good!


The boys also had a yogurt treat:


Those are Tucky's "I'm in heaven" eyes :)


And finally, in case you were wondering why bananas split easily into 3 parts when you squeeze them:


...it's clearly so that he can have a taste:


and so can he:

 
and there's still a piece left for me!
 
What's that? You weren't wondering about that at all? Oh well...I bet you're going to give it a try next time you eat a banana now aren't you? :)
Enjoy!
--Lindsay--